
Version 1.41 - 2013
Last: Vers. 5.xx - 2018
- ESF Developers' Guide
- Introduction
- Getting Started
- ESF Core/Foundation Code Examples
- ESF Protocol/Application Examples
- Supplementary Documentation
- Additional Eclipse and ESF Tooling
- Resources


PART 3. ESF CODE EXAMPLES
Update Manager Service
· Overview
· Update Manager Service Example
· Post- and Pre-install scripts
· Setup for Testing the Update
· Testing via Configuration Manager HTTP
· Testing Direct .star File Update
· Cleaning Up After the Update
Example
Overview
This example shows how to use the Update Manager Service, as well as create an update file to update a device. The ESF Update Manager Service uses the ESF Configuration Manager (CM) to get software updates into ESF. The CM is already highly adaptable in terms of getting Objects from remote locations into specific bundles. So, the Update Manager Service uses this as the mechanism to get the updates into the system as described in more detail here. The CM is described in more detail here and a code example is here.
In this example, you will learn how to
Create an update that can deployed on a working system
Deploy the created update to a target system
Prerequisites
· Integrating ESF Tooling and Projects into Eclipse
or
· Installing ESF Tooling into Wind River Workbench
and
· Hello World Using the ESF Logger
· Configuration Manager Service
Update Manager Service Example
This how-to goes through the process of creating an update to deploy to a target system. The process involves creating a zip file with a ‘project_releases.txt’ and one or more ‘star’ files in it. The update service is capable of deploying a series of updates. This keeps updates small, as well as allows updates to be incremental as old units may come online. Regardless, this structure does not prevent cumulative updates. One could create separate updates where each update included all of the previous updates as well. When deploying the updates, the zip file contains a project_releases.txt that only refers to a single star file that is the combination of all previous updates.
In this example, we make a very simple update. We add a single bundle and update the /etc/esf/*release*.xml file to reflect the new version. By default, every ESF system should have a /etc/esf/*release*.xml file. The format for this name is BOARD-PRODUCTNAME_release-MAJOR.MINOR.SUBMINOR.xml. We are using a Helios board, and the product is called Tomahawk. The current release of tomahawk is 1.0.0. So the new release file will be /etc/esf/helios-tomahawk_release-1.1.0.xml. In this update, we add a new business logic bundle (the hello world bundle from Hello World Using the ESF Logger), a modified services.xml file to automatically start the bundle, and a new release.xml file to reflect the changes.
In order to do this, we need the star builder components. There are four files of importance. These files are contained in the zip file 3.05-UpdateManager.zip. Download this file to the /tmp/ directory on an ESF system. Then execute the following commands to extract the necessary components.
cd /tmp
unzip 3.05-UpdateManager.zip
Before creating the update, issue the following command to back up your existing files, so that you can restore the system back to present condition.
tar cvf /root/version_backup.tar /etc/esf/*.xml /opt/jvm/esf/configuration/.esf/com.esf.core.system.bootstrap/services.xml /opt/jvm/esf/configuration/.esf/com.esf.core.system.manager/esf.props
makeEsfStar.sh script
The first file is the ‘makeEsfStar.sh’, which is the script that is run to generate the actual star file. It has three parameters that must be set on a project by project basis. These parameters are
COMPANY=[the company that owns the product]
PROJECT=[board-product, where the “board” is the hardware, and “product” is the software being released]
UPDATE_SERVER_LOCATION=[URL of the update server if one exists (can be blank)]
The example parameters are
COMPANY=eurotech
PROJECT=helios-tomahawk
UPDATE_SERVER_LOCATION=
If the UPDATE_SERVER_LOCATION is set, then the makeEsfStar.sh script will fetch the current version of UPDATE_SERVER_FILE from the server and append the new line to it. If it is not specified, it simply creates a new project_releases.txt that only contains one line representing the new star file being created.
fileIncludeList
The second piece of interest in the making of star files is the file called fileIncludeList. It is simply a list of files with their full paths that should be included in the star file.
The fileIncludeList for our example is
# Include below a list of all the filesystem files to be included
/etc/esf/helios-tomahawk_release-1.1.0.xml
/opt/jvm/esf/bundlefiles/com.esf.example.helloworld_1.0.0.201007301252.jar
/opt/jvm/esf/configuration/.esf/com.esf.core.system.bootstrap/services.xml
Post- and Pre-install scripts
There are two additional files that are of interest in the star file creation: preinst_script and the postinst_script. As the names suggest, these files are scripts that are put into the star file and run either before or after the main tar file containing the files in fileIncludeList is extracted. They can be used to do work like deleting old files, logging information, or installing RPMs. The preinst_script is run before any other files are extracted. The postinst_script is run after the files are extracted into the filesystem.
In the preinst_script, remove any old copies of the .jar files that are being installed. Use a “rm -f bundlename_*.jar” to remove any existing copies, but be careful not to remove the bundlename.service*.jar if you aren’t installing a new service bundle.
The following are the examples for this how-to.
root@localhost:/tmp> cat preinst_script
#!/bin/sh
date >> /tmp/update.log
echo preinstall script in update 1.1.0 was run >> /tmp/update.log
#remove old files
echo removing helios-tomahawk_release-1.0.0.xml >> /tmp/update.log
rm /etc/esf/helios-tomahawk_release-1.0.0.xml
echo removing old .jar files >> /tmp/update.log
rm -f /opt/jvm/esf/bundlefiles/com.esf.example.helloworld_*.jar
root@localhost:/tmp> cat postinst_script
#!/bin/sh
date >> /tmp/update.log
echo postinstall script in update 1.1.0 was run >> /tmp/update.log
Add Files to Target
Before running makeEsfStar.sh, make sure the target device has been updated with all the changes going into the update. In this example, you are using the 3.05-UpdateManager.zip example file, so you will need to make the following modifications to your system to be compatible with the example.
1. Add all new files to be installed on the target. This may include .jar files and all other file system components. Make sure the permissions on the files are correct. If including RPMs or Debians, include them under the /tmp/ directory. In this example, include the com.esf.example.helloworld_1.0.0.201007301252.jar in the /opt/jvm/esf/bundlefiles/ directory (actual filename will be different when you create your HelloWorld plug-in).
2. Make sure the file /opt/jvm/esf/configuration/.esf/com.esf.core.system.bootstrap/services.xml has been updated to automatically start any new Java projects. In this example, modify the services.xml file to include the helloworld example.
nano /opt/jvm/esf/configuration/.esf/com.esf.core.system.bootstrap/services.xml
Add the following lines.
<bundle>
<name>com.esf.example.helloworld</name>
<log_level>LOG_LEVEL_WARNING</log_level>
</bundle>
3. Update the release.xml file according to the current product and release number. In this example, create a file named /etc/esf/helios-tomahawk_release-1.1.0.xml with the following contents.
<?xml version="1.0" encoding="UTF-8"?>
<release>
<comment>Helios Denali</comment>
<esf_version>1.4.0</esf_version>
<product_name>helios-denali</product_name>
<product_version>1.4.1</product_version>
<bios_version>09.00.00.06</bios_version>
<micro_controller_version>14.01.00.06</micro_controller_version>
<cpld_version>2.33</cpld_version>
<os_version>4.2.0</os_version>
<target_platform>
<name>helios</name>
<version>revA</version>
</target_platform>
<esf_bundles>
<bundle>
<name>com.esf.example.helloworld</name>
<target_bundle>com.esf.example.helloworld_1.0.0.201007301252.jar</target_bundle>
<location>ESF_ROOT trunk</location>
<version>1.0.0.201007301252</version>
</bundle>
</esf_bundles>
</release>
Creating an Update File
With all these files in place, we can run the makeEsfStar.sh to build the update. All four of the make files (makeEsfStar.sh, fileIncludeList, preinst_script, and postinst_script) should be placed in /tmp/ on the target.
The makeEsfStar.sh script pulls the files from this unit as listed in the fileIncludeList into a zipped copy. The following is output for our example.
#######################################################################################
root@localhost:/tmp> ./makeEsfStar.sh
making /tmp/new_star
validating versions
the current version is: 1.1.0
fetching the latest releases.txt file
not making /tmp/ dir
Tarring the following files into the star file...
./
./opt/
./opt/jvm/
./opt/jvm/esf/
./opt/jvm/esf/configuration/
./opt/jvm/esf/configuration/.esf/
./opt/jvm/esf/configuration/.esf/com.esf.core.system.bootstrap/
./opt/jvm/esf/configuration/.esf/com.esf.core.system.bootstrap/services.xml
./opt/jvm/esf/bundlefiles/
./opt/jvm/esf/bundlefiles/com.esf.example.helloworld_1.0.0.201007301252.jar
./etc/
./etc/esf/
./etc/esf/helios-tomahawk_release-1.1.0.xml
./tmp/
./tmp/postinst_script
./tmp/preinst_script
Adding .star pre-script tmp/preinst_script.
Adding .star post-script tmp/postinst_script.
adding: eurotech_helios-tomahawk_update-1.1.0.star (deflated 32%)
adding: helios-tomahawk_releases.txt (deflated 8%)
com_esf_core_updater.file
eurotech_helios-tomahawk_update-1.1.0.star created successfully:
star file is /tmp/eurotech_helios-tomahawk_update-1.1.0.star
version file is /tmp/helios-tomahawk_releases.txt
update file is /tmp/tcd_file_tgz_1.tgz
#######################################################################################
Check the previous output to make sure that all the needed files were included in the update file list.
There are three new files in /tmp/: tcd_file_tgz_1.tgz, eurotech_helios-tomahawk_update-1.1.0.star, and helios-tomahawk_releases.txt. These files can now be placed on an update server or deployed directly to other targets. The tcd_file_tgz_1.tgz file can be used to apply the update via the CM HTTP service. The .star file can also be deployed directly via command prompt. These two methods are described in the next sections.
If you are using Denali, you can also use the Update configuration tab. See the Denali User Manual for instructions.
Testing
Setup for Testing the Update
Before testing the update, we need to make sure your ESF system is back to a “normal” state. Ideally, this step would include re-installing your present version of software to its pristine state, applying the update cleanly to the current system, and validating to make sure it all works correctly before deploying this update to a field application. However, for this example it’s only necessary to remove any changes that we introduced to the system. If you used the same device to create the update as you will use to test the install, perform the following steps to make the system look like it would prior to the update being installed.
1. Remove the new files from the target. In this example, remove com.esf.example.helloworld_1.0.0.201007301252.jar from the /opt/jvm/esf/bundlefiles/ directory.
rm /opt/jvm/esf/bundlefiles/com.esf.example.helloworld_1.0.0.201007301252.jar
2. Modify the services.xml
nano /opt/jvm/esf/configuration/.esf/com.esf.core.system.bootstrap/services.xml
and remove the following lines.
<bundle>
<name>com.esf.example.helloworld</name>
<log_level>LOG_LEVEL_WARNING</log_level>
</bundle>
3. Move the file /etc/esf/helios-tomahawk_release-1.1.0.xml to /etc/esf/helios-tomahawk_release-1.0.0.xml (the contents don’t really matter for our present purpose). This step will simulate a system running the “tomahawk” product name, which is starting at version 1.0.0. After the update, the version file will be replaced with the 1.1.0 version.
mv /etc/esf/helios-tomahawk_release-1.1.0.xml /etc/esf/helios-tomahawk_release-1.0.0.xml
or
rm /etc/esf/*.xml
touch /etc/esf/helios-tomahawk_release-1.0.0.xml
Testing via Configuration Manager HTTP
One way to load software updates into ESF is via the Configuration Manager. This step will use the tcd_file_tgz_1.tgz file created previously. First, use the steps in the section Setup for Testing the Update to set up for testing.
From the Linux command line, tail the Equinox log file.
tail -f /tmp/equinox.log
To test the update using CM, open a browser to the address http://[ip_address]:8080/com/esf/core/configuration/cpi/HttpServer (substituting your actual address for “[ip_address]”). A simple dialog will open as shown in figure 1.
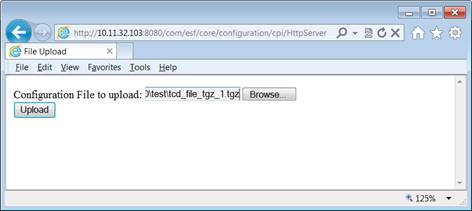
Figure 1 Uploading the Update
Browse to the tcd_file_tgz_1.tgz file you have copied over to your PC. Then, click the Upload button. On the ESF console, you should see the following output.
[WARNING] 2012-05-07 20:14:08.495 - com.esf.core.updater.EsfUpdater: ******************************** WARNING - ABOUT TO UPDATE ********************************
[WARNING] 2012-05-07 20:14:08.495 - com.esf.core.updater.EsfUpdater: about to update from 1.0.0 to helios-tomahawk_update-1.1.0
[WARNING] 2012-05-07 20:14:08.496 - com.esf.core.updater.EsfUpdater: ESF will shut down for the udpate and the unit may reboot depending on what the update includes
[WARNING] 2012-05-07 20:14:08.496 - com.esf.core.updater.EsfUpdater: Do not remove power to the unit until this process is complete
[WARNING] 2012-05-07 20:14:08.496 - com.esf.core.updater.EsfUpdater: ******************************** WARNING - ABOUT TO UPDATE ********************************
[WARNING] 2012-05-07 20:14:11.152 - com.esf.core.updater.EsfUpdater: ******************************** END WARNING - UPDATE COMPLETE! ********************************
The update creates a file /tmp/update.log, which can be observed to see more results of the update process.
root@localhost:/tmp> more /tmp/update.log
Self-extracting archive... please wait
Extracting eurotech_helios-tomahawk_update-1.1.0.star}
Running .star pre-script /tmp/preinst_script
Mon May 7 21:47:40 GMT 2012
preinstall script in update 1.1.0 was run
removing helios-tomahawk_release-1.0.0.xml
removing old .jar files
Running .star post-script /tmp/postinst_script
Mon May 7 21:47:40 GMT 2012
postinstall script in update 1.1.0 was run
Extraction completed.
After testing the update, if needed, restore the original system files in the section Cleaning Up After the Update.
Testing Direct .star File Update
Another way to load software updates into ESF is directly from the command line. This step will use the eurotech_helios-tomahawk_update-1.1.0.star file created previously. First, use the steps in the section Setup for Testing the Update to set up for testing.
Download the eurotech_helios-tomahawk_update-1.1.0.star file into the /tmp/ directory on the target. From a command line, issue the following commands.
cd /tmp
touch update.log
tail -f update.log & (Notice the ampersand ‘&’ at the end.)
sh eurotech_helios-tomahawk_update-1.1.0.star
The output of the /tmp/update.log file can be observed to see more results of the update process.
Running .star pre-script /tmp/preinst_script
Tue May 8 15:28:35 GMT 2012
preinstall script in update 1.1.0 was run
removing helios-tomahawk_release-1.0.0.xml
removing old .jar files
Running .star post-script /tmp/postinst_script
Tue May 8 15:28:35 GMT 2012
postinstall script in update 1.1.0 was run
Extraction completed.
After testing the update, if needed, restore the original system files in the section Cleaning Up After the Update.
Cleaning Up After the Update
After testing the update process, you can restore the system files to their original state with the following commands.
rm /etc/esf/*.xml
tar xvf /root/version_backup.tar -C /
rm /opt/jvm/esf/bundlefiles/com.esf.example.helloworld_1.0.0.201007301252.jar
The code to create this update can be found here. This does not need to be imported into Eclipse as it all runs on the target system.