
Version 2.0 - Legacy
Last: Vers.7.xx - 2022
- ESF Developers' Guide
- Introduction
- Getting Started
- ESF Code Examples
- Supplementary Documentation
- Resources


PART 3. ESF Examples
Configurable Component Example
Configurable Component Example
· Add Dependencies to Manifest
· Create the Default Configuration
View the Bundle Configuration in the Local Web UI
View the Configuration in Everyware Cloud
Overview
This section provides a simple example showing how to create an OSGi bundle that implements the ConfigurableComponent interface in ESF. This bundle will interact with the ESF ConfigurationService via the ConfigurableComponent interface. It also uses the MQTT services in ESF to connect to the Everyware Cloud. This allows for remote configuration via the Everyware Cloud, in addition to a local configuration mechanism using a Web UI. Both of these features will be demonstrated here. In this example, you will learn how to
· Create a plugin project
· Implement the ConfigurableComponent interface
· Use ESF and Cloud tooling to modify the bundle’s configuration
· Export a single OSGi bundle (plug-in)
Prerequisites
· Setting up ESF Development Environment
Configurable Component Example
Create Plug-in
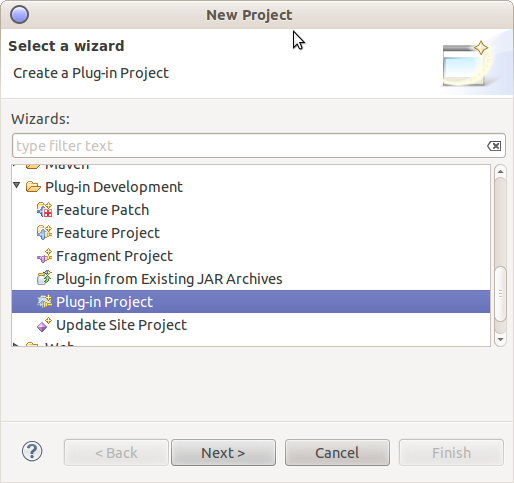
In Eclipse, create a new Plug-in project by selecting File | New | Project. Select Plug-in Development | Plug-in Project and click Next.
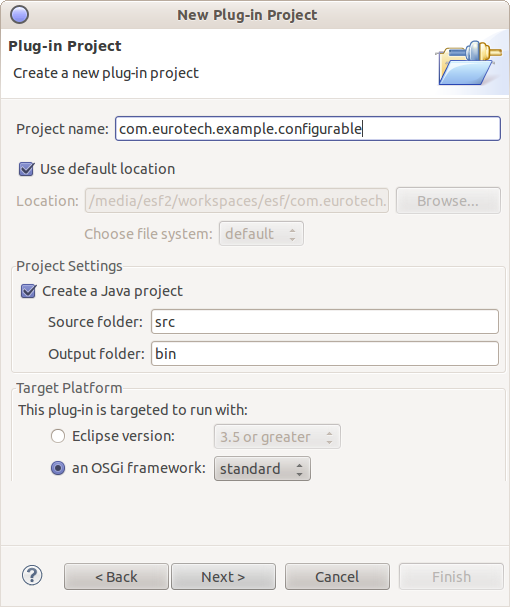
Your screen should display the New Plug-in Project dialog box as shown in the following screen capture. Give your project a name, such as “com.eurotech.example.configurable”. Under Target Platform, ensure that the an OSGi framework option button is selected and set to standard as shown in the following screen capture. You can also (optionally) add projects to a working set. To continue, click Next.
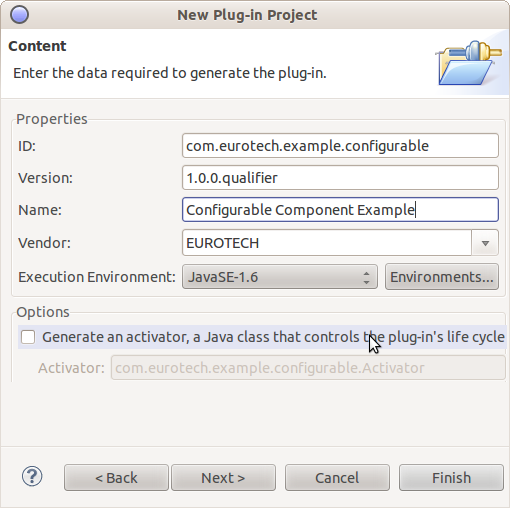
In the next menu, change the Name field to something more descriptive, such as “Configurable Component Example.” Make sure the Execution Environment list is set to match the JVM version running on the target device (JavaSE-1.6 or JavaSE-1.7).
Also, uncheck the Generate an activator, a Java class that controls the plug-in’s life cycle option button. In this example, you will just have a single class. You will not create an Activator class because you will use OSGi Declarative Services to start and stop the bundle.
Finally, click Finish.
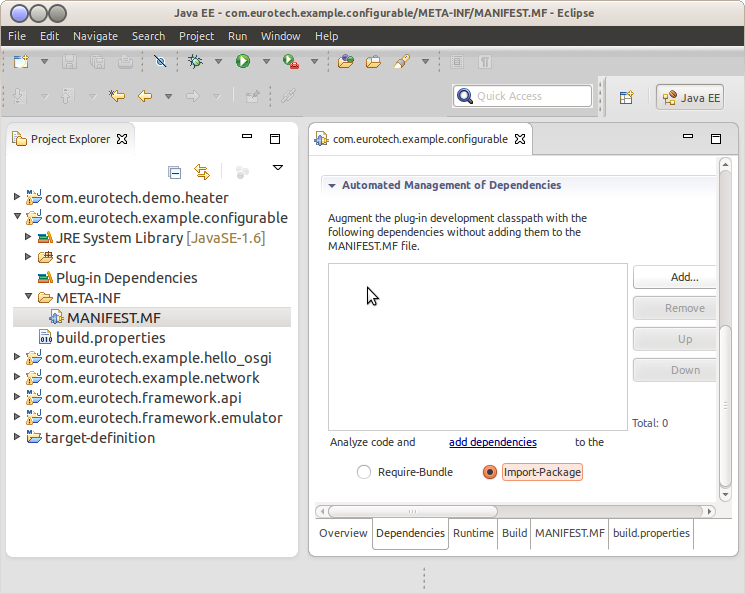
You should see the new project in the Package Explorer (or Project Explorer) in Eclipse. Also, you will see the MANIFEST.MF was automatically opened in the Manifest Editor. An OSGi bundle is really just a regular Java .jar file containing Java code and resources, along with a custom Manifest and an Activator. The manifest will be modified in the next section.
Add Dependencies to Manifest
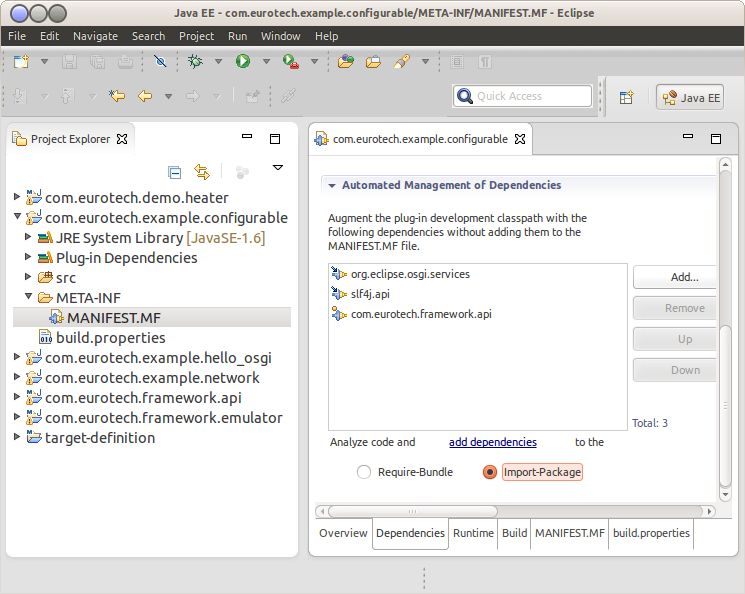
First, you will use the Manifest Editor in Eclipse to add some dependencies. Click the Dependencies tab at the bottom and then click the Automated Management of Dependencies heading to expand it.
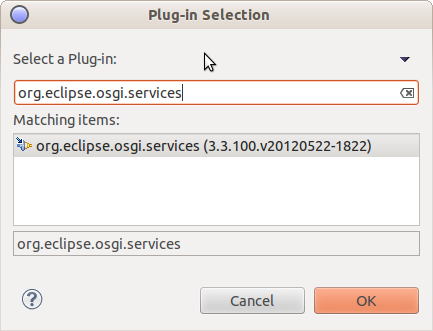
Under Automated Management of Dependencies, click Add. In the Select a Plug-in field, enter org.eclipse.osgi.services. Select the plug-in name and click OK.
Note this is very much like adding standalone jars to the buildpath by including the ‘-cp’ argument to javac. However, in this case you are telling Eclipse where to find these dependencies the “OSGi way”, so it is aware of them at compile time.
Click Add again and use the same procedure to add the following dependencies:
· slf4j.api
· com.eurotech.framework.api
You should now see the list of dependencies. Save changes to the Manifest.
Create Java Class
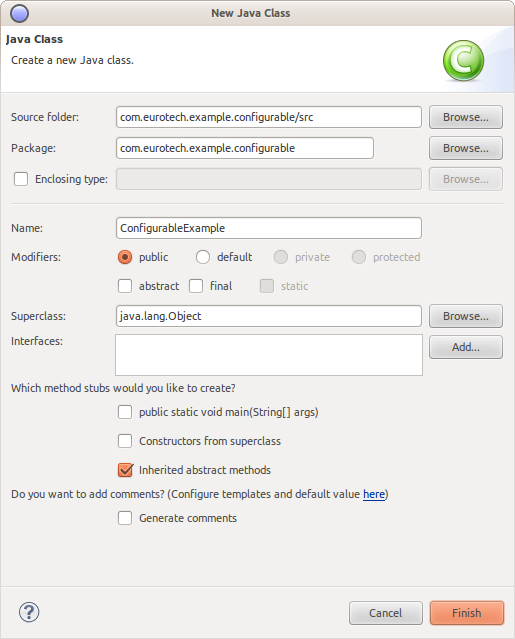
Now you are ready to start writing a simple Java class. Right-click the com.eurotech.example.configurable project. Select New | Class. Set the Package field to com.eurotech.example.configurable, set the Name field to ConfigurableExample, and then click Finish.
Write the following code for the new class. You can copy and paste this code into your newly created Java class file.
|
package com.eurotech.example.configurable;
public class ConfigurableExample implements ConfigurableComponent {
private static final Logger s_logger = LoggerFactory.getLogger(ConfigurableExample.class); private static final String APP_ID = "com.eurotech.example.configurable.ConfigurableExample";
private Map<String, Object> properties;
protected void activate(ComponentContext componentContext) { s_logger.info("Bundle " + APP_ID + " has started!"); }
protected void activate(ComponentContext componentContext, Map<String, Object> properties) { s_logger.info("Bundle " + APP_ID + " has started with config!"); updated(properties); }
protected void deactivate(ComponentContext componentContext) { s_logger.info("Bundle " + APP_ID + " has stopped!"); }
public void updated(Map<String, Object> properties) { this.properties = properties;
if(properties != null && !properties.isEmpty()) { Iterator<Entry<String, Object>> it = properties.entrySet().iterator(); while(it.hasNext()) { Entry<String, Object> entry = it.next(); s_logger.info("New property - " + entry.getKey() + " = " + entry.getValue() + " of type " + entry.getValue().getClass().toString()); } } } }
|
The activate() method is the entry point when the bundle is started. Note this class has two forms of the activate() method. The second method (with the “Map<String, Object> properties” parameter) enables a default configuration to be specified at bundle start time. The deactivate() method is the entry point when the bundle is stopped. You have also specified an updated() method. This is how the bundle receives a new configuration from the ESF configuration manager. So, most of the heavy lifting of configuration management is handled automatically by ESF. You simply need to implement the ConfigurableComponent interface and the updated() method.
Resolve Dependencies
At this point, there will be errors in your code because of unresolved imports.
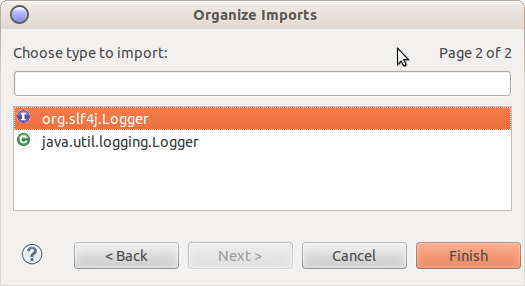
Select the menu Source | Organize Imports to resolve these errors. Because you added dependencies to your dependency list in the Manifest, you will be prompted to choose one of two potential sources for importing a few classes, then click Finish.
· For the “Entry” class. Select java.util.Map.Entry.
· For the “Logger” class. Select org.slf4j.Logger.
Now the errors in the class should have been resolved. Save the changes to the ConfigurableExample class.
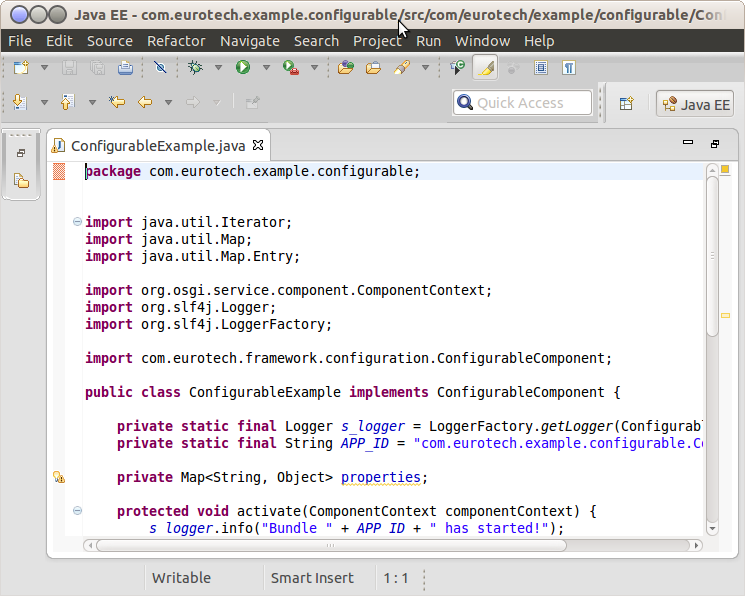
The complete set of code (with import statements) is shown below.
|
package com.eurotech.example.configurable;
import java.util.Iterator; import java.util.Map; import java.util.Map.Entry;
import org.osgi.service.component.ComponentContext; import org.slf4j.Logger; import org.slf4j.LoggerFactory;
import com.eurotech.framework.configuration.ConfigurableComponent;
public class ConfigurableExample implements ConfigurableComponent {
private static final Logger s_logger = LoggerFactory.getLogger(ConfigurableExample.class); private static final String APP_ID = "com.eurotech.example.configurable.ConfigurableExample";
private Map<String, Object> properties;
protected void activate(ComponentContext componentContext) { s_logger.info("Bundle " + APP_ID + " has started!"); }
protected void activate(ComponentContext componentContext, Map<String, Object> properties) { s_logger.info("Bundle " + APP_ID + " has started with config!"); updated(properties); }
protected void deactivate(ComponentContext componentContext) { s_logger.info("Bundle " + APP_ID + " has stopped!"); }
public void updated(Map<String, Object> properties) { this.properties = properties;
if(properties != null && !properties.isEmpty()) { Iterator<Entry<String, Object>> it = properties.entrySet().iterator(); while(it.hasNext()) { Entry<String, Object> entry = it.next(); s_logger.info("New property - " + entry.getKey() + " = " + entry.getValue() + " of type " + entry.getValue().getClass().toString()); } } } }
|
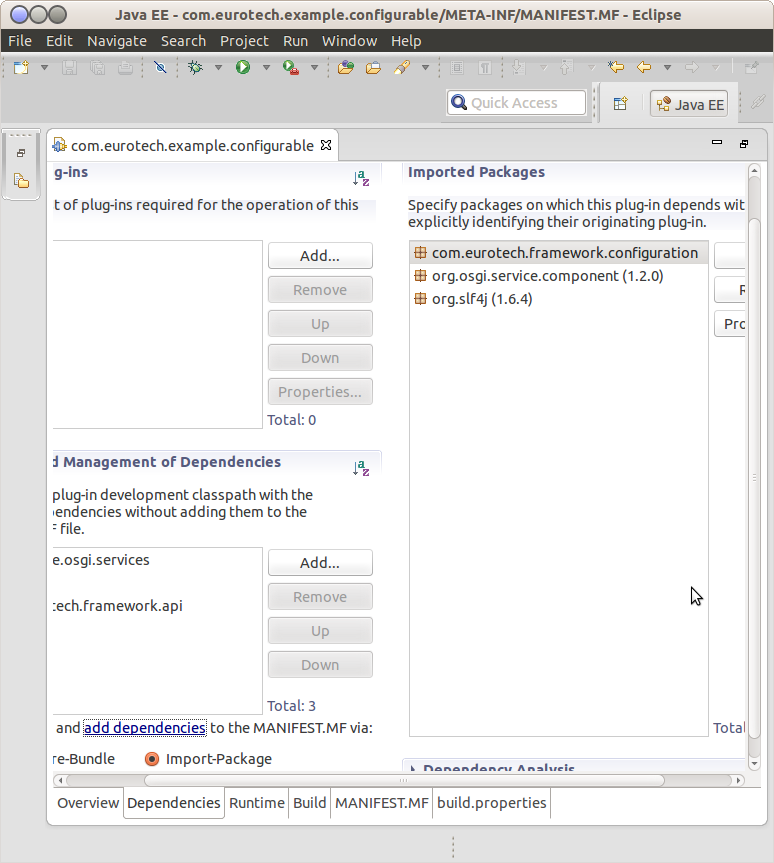
Switch back to the Manifest Editor. Under Automated Management of Dependencies, ensure the Import-Package option button is selected. Click the add dependencies link to automatically add packages to the dependencies list (under Imported Packages) based on the “import” statements in your example code. Save changes to the Manifest again.
Create Component Class
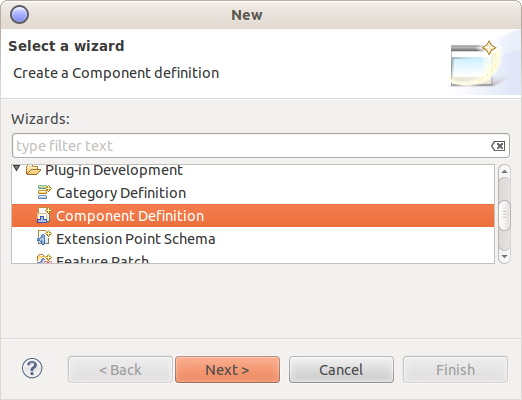
Right-click the example project’s “OSGI-INF” folder and select New | Other. From the wizard, select Plug-in Development | Component Definition and click Next.
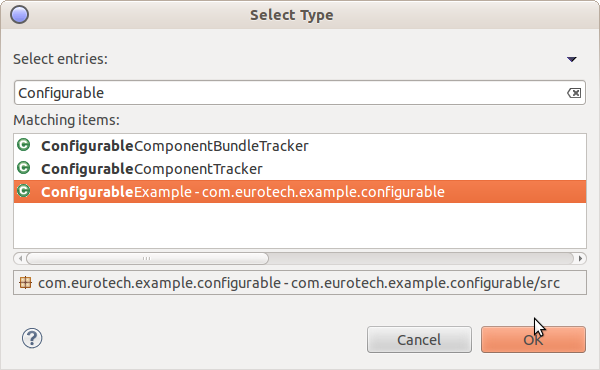
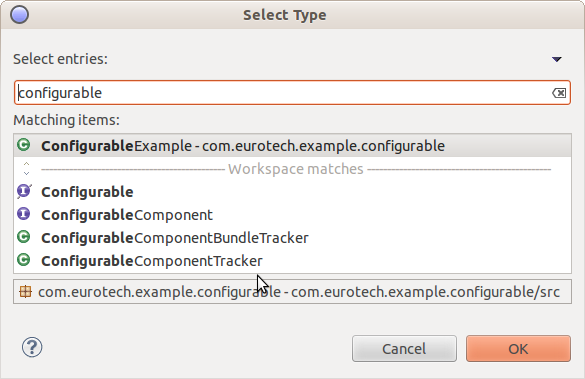
Next to the Class field, click Browse and type the name of your newly created class in the Select entries field. In this case, type the word “Configurable”, and you will see a list of matching items. Select the ConfigurableExample class and click OK.
In the Enter or select the parent folder field, make sure “/OSGI-INF” is at the end of the existing entry (e.g., com.eurotech.example.configurable/OSGI-INF). Set the Name field equal to the Class field. Then click Finish.

After the Component class has been created, it will open in the Workspace. On the Services tab, click the Add button under Provided Services. Enter “configurable” and select the interface “com.eurotech.example.configurable.ConfigurableExample”. This is required for components that are configurable through the ESF ConfigurationService, so that they expose a Service.
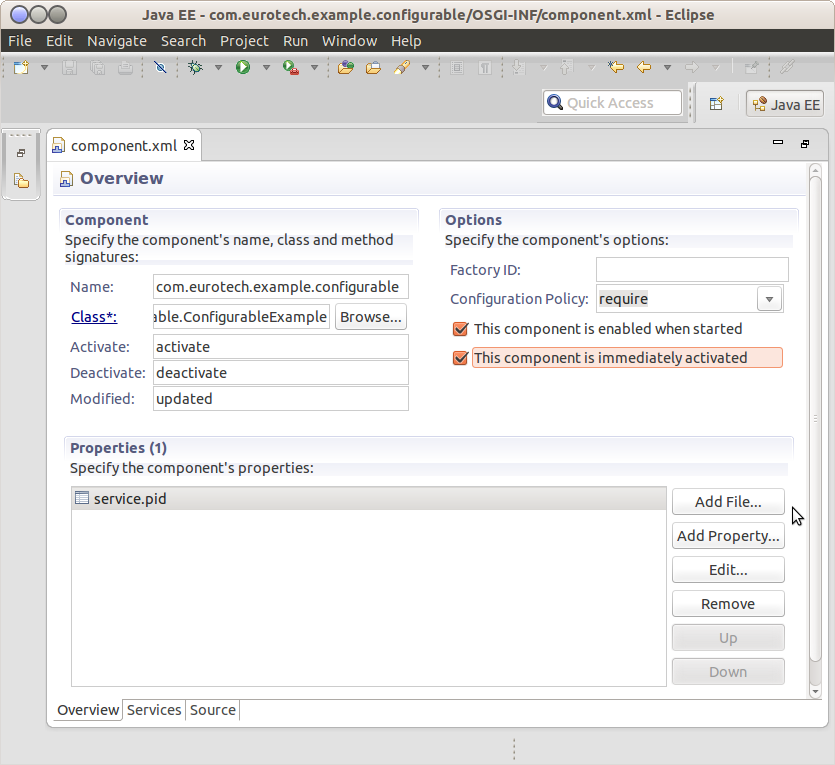
In the Overview tab, the Name and Class fields should already point to your Java class. Make the following settings:
· Set the Activate field to activate and set the Deactivate field to deactivate. This tells the component where these OSGi activation methods are located.
· Set the Modified field to updated. This tells the component which method to call when the configuration is updated.
· Set the Configuration Policy to require.
· Uncheck the box This component is enabled when started, then check both boxes This component is enabled when started and This component is immediately activated.
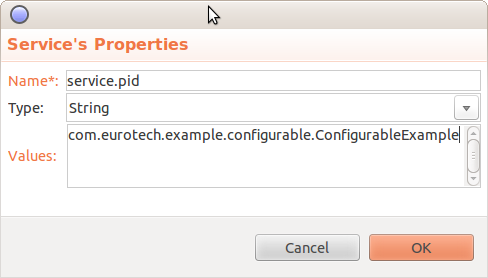
Click the Add Property button. Enter a property with the name “service.pid” and value “com.eurotech.example.configurable.ConfigurableExample”.
Save the Component class definition file and verify that the completed Overview tab looks like this:
Check the Source tab of the component.xml file and carefully verify that each of the property values and tags match what is shown below.
|
<?xml version="1.0" encoding="UTF-8"?> <scr:component xmlns:scr="http://www.osgi.org/xmlns/scr/v1.1.0" activate="activate" configuration-policy="require" deactivate="deactivate" enabled="true" immediate="true" modified="updated" name="com.eurotech.example.configurable.ConfigurableExample">
<implementation class="com.eurotech.example.configurable.ConfigurableExample"/> <service> <provide interface="com.eurotech.example.configurable.ConfigurableExample"/> </service> <property name="service.pid" type="String" value="com.eurotech.example.configurable.ConfigurableExample"/> </scr:component>
|
Create the Default Configuration
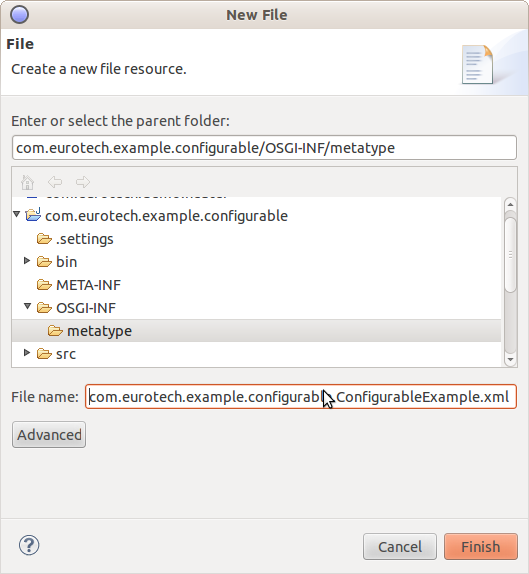
With the component definition file created, you also need to specify the configurable parameters of this bundle. This is done using the “metatype” definition. Right-click the OSGI-INF directory for the example project in the Package Explorer window and select New | Folder. Name the folder “metatype”. Now right-click the metatype folder and select New | File. Name the file “com.eurotech.example.configurable.ConfigurableExample.xml” as shown in the following screen capture.
At this point, you have to write the ‘metatype’ file that defines the parameters, default values, types, etc. Click on the Source button and paste the following XML text into ConfigurableExample.xml for this example. Save changes to ConfigurableExample.xml.
|
<?xml version="1.0" encoding="UTF-8"?> <MetaData xmlns="http://www.osgi.org/xmlns/metatype/v1.2.0" localization="en_us"> <OCD id="com.eurotech.example.configurable.ConfigurableExample" name="ConfigurableExample" description="This is a sample metatype file for a simple configurable component">
<AD id="param1.string" name="param1.string" type="String" cardinality="0" required="true" default="Some Text" description="String configuration parameter"/>
<AD id="param2.float" name="param2.float" type="Float" cardinality="0" required="false" default="20.5" min="5.0" max="40.0" description="Float configuration parameter"/>
<AD id="param3.integer" name="param3.integer" type="Integer" cardinality="0" required="true" default="2" min="1" description="Integer configuration parameter"/>
</OCD>
<Designate pid="com.eurotech.example.configurable.ConfigurableExample"> <Object ocdref="com.eurotech.example.configurable.ConfigurableExample"/> </Designate> </MetaData>
|
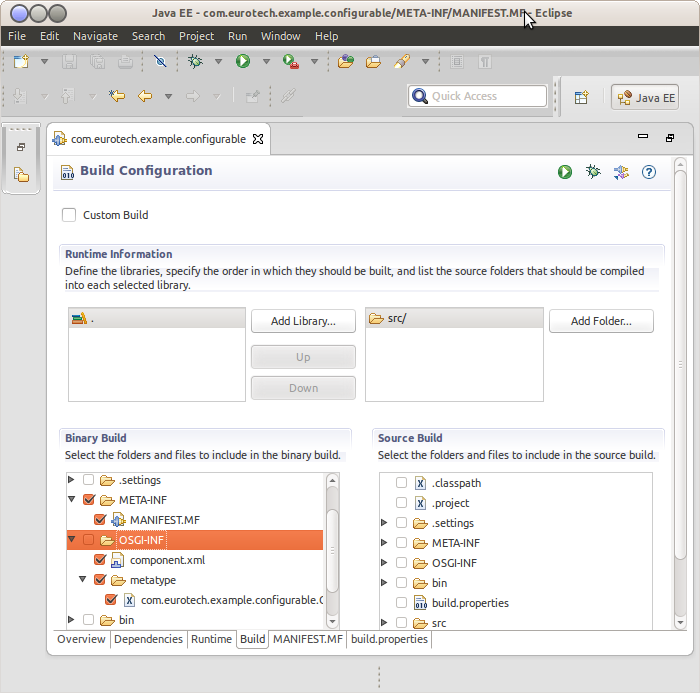
Now in the MANIFEST.MF of this bundle, you must also make sure the XML file gets packaged into the bundle when you export the plug-in. Click the Build tab, and in the Binary Build section of the Manifest editor ensure that all the checkboxes for items under META-INF and OSGI-INF are checked. Save the Manifest after making this change.
Run the Bundle
At this point, you can run the bundle using the emulator in Eclipse (Linux or OS X only). To do so, expand the com.eurotech.framework.emulator project in the package explorer and browse to src/main/resources. Based on what platform you are running on, right click ESF_Emulator_[OS].launch (where “[OS]” specifies your operating system) and select Run as | ESF_EMULATOR_[OS].launch. This will start the ESF emulator and your new bundle in the console window of Eclipse.
View the Bundle Configuration in the Local Web UI
With the bundle running, open a browser window on the same computer as the Eclipse development environment and browse to http://127.0.0.1:8080. The username/password is admin/admin. When logging in, you should see the new configurable component and its associated parameters in the lower left pane as shown in the following screen capture:

You can change the parameters here, which will update the configuration manager of ESF and in turn will call the updated() method of the newly created bundle. Every time a change is made to the configuration, a new snapshot is generated along with an ID.
View the Configuration in Everyware Cloud
If you have an Everyware Cloud account, you can see the configurable component in the Everyware Cloud console. To do so, ensure the MqttDataTransport and DataService are configured appropriately using your Everyware Cloud credentials. Then browse to the Cloud Console. In the Devices section under the Configuration tab, ensure that your device is shown with a connected state (green light). Select your device, and you should see a window similar to the following screen capture.

From the Cloud Console, configuration changes can be made and pushed to the remote device by clicking the Apply button. See the Managing Devices section of the Everyware Cloud Developers’ Guide for more information on the Devices section of the Cloud Console.