
Version 1.41 - 2013
Last: Vers. 5.xx - 2018
- ESF Developers' Guide
- Introduction
- Getting Started
- ESF Core/Foundation Code Examples
- ESF Protocol/Application Examples
- Supplementary Documentation
- Additional Eclipse and ESF Tooling
- Resources


PART 6. ADDITIONAL ECLIPSE TOOLING
ESF Eclipse MQTT Client
ESF Eclipse MQTT Client Integration
· Overview
· Installing the ESF Eclipse MQTT Client
· Using the ESF Eclipse MQTT Client
ESF Eclipse MQTT Client Integration
Overview
This how-to shows how to add the ESF Eclipse MQTT Client to Eclipse. The ESF Eclipse MQTT Client is a tool that allows you to publish and subscribe to messages on an MQTT broker including the Cloud Service. It makes debugging and testing easier, in that a user can manually issue publications on specified topics with custom payloads or subscribe to topics to verify that other components are properly publishing messages to the broker.
In order to use this example, you need to have a registered account in an MQTT broker, such as the Eurotech Everyware™ Cloud. If you have not already set up an account for Cloud publishing, contact your regional Eurotech sales manager or email sales.us@eurotech.com to request an Everyware Cloud account. When your account is created, you will receive your account credentials (Username, Password, and broker URL) in a registration email. For details about accessing your Everyware Cloud, refer to the Everyware Cloud Developer’s Guide.
In this example, you will learn how to
· Use the ESF MQTT Client Plug-in for Eclipse
Prerequisites
or
· Installing ESF Tooling into Wind River Workbench
Installing the ESF Eclipse MQTT Client
The ESF Eclipse MQTT Client is available from the ESF update site. See the instructions in Integrating ESF Tooling and Projects into Eclipse to install the ‘Eclipse MQTT Client’.
Using the ESF Eclipse MQTT Client
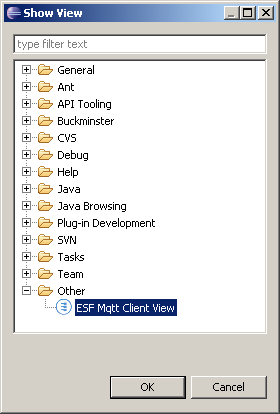
With the plugin now installed, you can now open it. Go to ‘Window -> Show View -> Other’. Select ‘Other -> ESF Mqtt Client View’ and click ‘OK’.
You will get a new tab with the ‘ESF Mqtt Client View’. Double-click the ‘ESF Mqtt Client View’ tab to expand it to the full Eclipse Window.
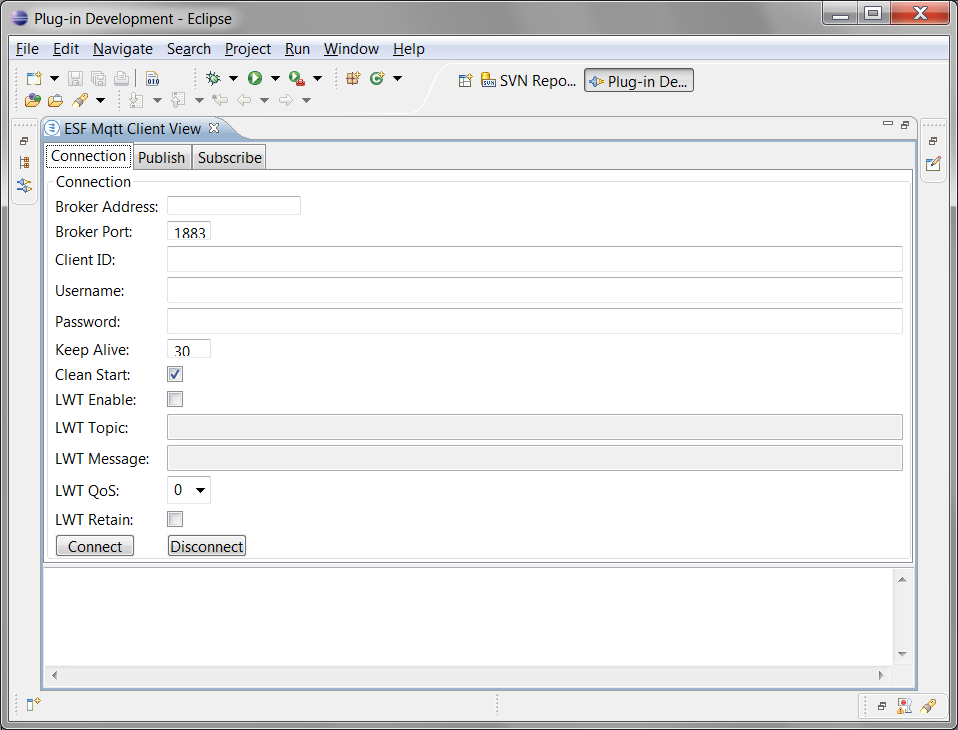
In the Connection tab, you should enter the following information to point to your broker account (credentials obtained from Eurotech, if using the Everyware™ Cloud):
|
Property |
Description |
|
Broker Address |
IP address or URL of the broker |
|
Broker Port |
TCP port of the MQTT connection (generally 1883 or 8883) |
|
Client ID |
Unique ID in the broker for this connection. Each device connected to the Cloud must connect with a unique ID. ESF devices use the eth0 MAC address by default. |
|
Username |
Username in the broker. In the Everyware™ Cloud, one account may have more than one user associated with it. The user must be configured to allow broker connection privileges. |
|
Password |
Password associated with the Username |
|
Keep Alive |
Number of seconds to send a Keep Alive message to verify the active connection to the broker |
|
Clean Start |
With this box checked, each new connection to the broker will clear out any previous subscriptions. |
|
LWT Enable |
Enable the Last Will and Testament (LWT). The LWT is optional and generally unnecessary for testing with Eclipse. It is a feature of the MQTT protocol that allows a client to send a message to the broker upon connection. When its connection is lost or disconnected, other subscribers will be notified that this device was disconnected by receiving the LWT Message. |
|
LWT Topic |
Topic on which to publish the Last Will and Testament |
|
LWT Message |
The content of this connection’s Last Will and Testament, which will be sent to other clients upon disconnect, if they have subscribed to this device’s LWT. |
|
LWT QoS |
Quality of Service of the Last Will and Testament |
|
LWT Retain |
Checkbox indicates whether or not the Last Will and Testament publication will be retained by the broker. |
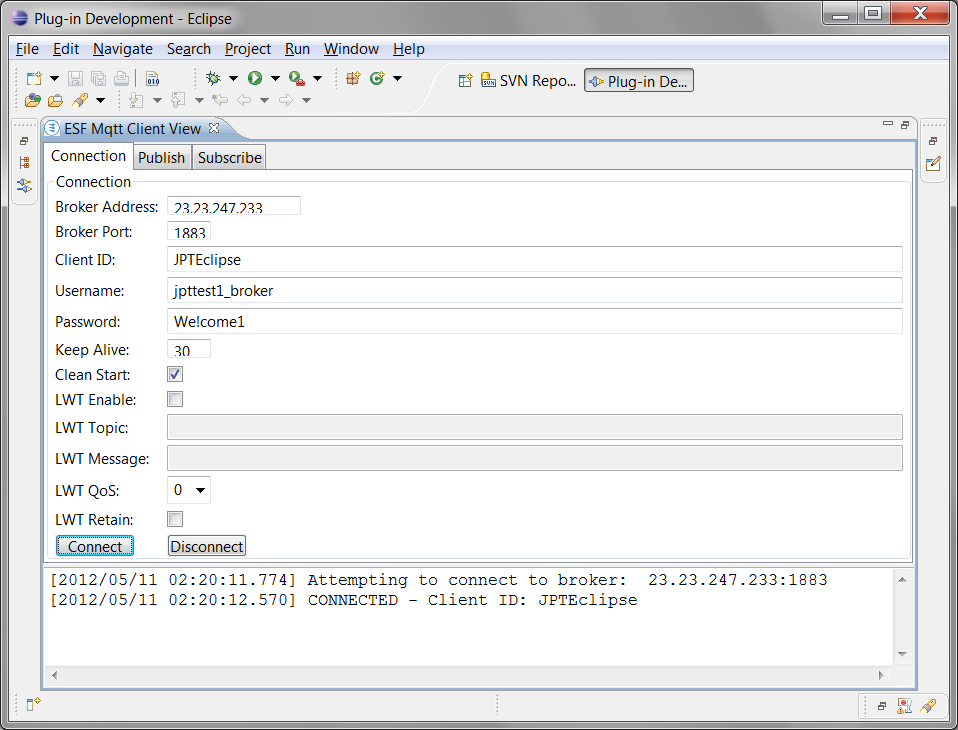
Once you have the parameters set as needed, click the ‘Connect’ button. This will show a CONNECTED message if it is successful.
When connected, you can subscribe to topics of your choice using the Subscribe tab. We will first subscribe to the topic “#”. The “#” is a wildcard that includes all topics under the present level of the topic hierarchy.

You can also use the client to publish a message on a given topic. If you are subscribed to the right topic(s) hierarchy, you will see the published message sent by your client or any other connected clients.
Enter a Topic name in the following format:
AccountName/ClientID/additional/topic/space
where
· “AccountName” is the account on the broker (provided by Eurotech, if using the Everyware™ Cloud).
· “ClientID” is a unique name of a client on the broker. You should use the unique client ID chosen above in the MQTT connect window.
· “additional/topic/space” is a topic of your choice. Publish/Subscribe topics are discussed a bit more in the next section, but the basic idea is that the topic space is a hierarchal organization of the data sent or received from the broker. The levels in the hierarchy are separated by a forward slash “/”.
In this example, the topic is chosen to be jpttest1/JPTEclipse/test/topic.
Enter the Payload, which is text of your choice.
Then click the ‘Publish Payload’ button. The following screen capture shows this publish being generated in Eclipse.
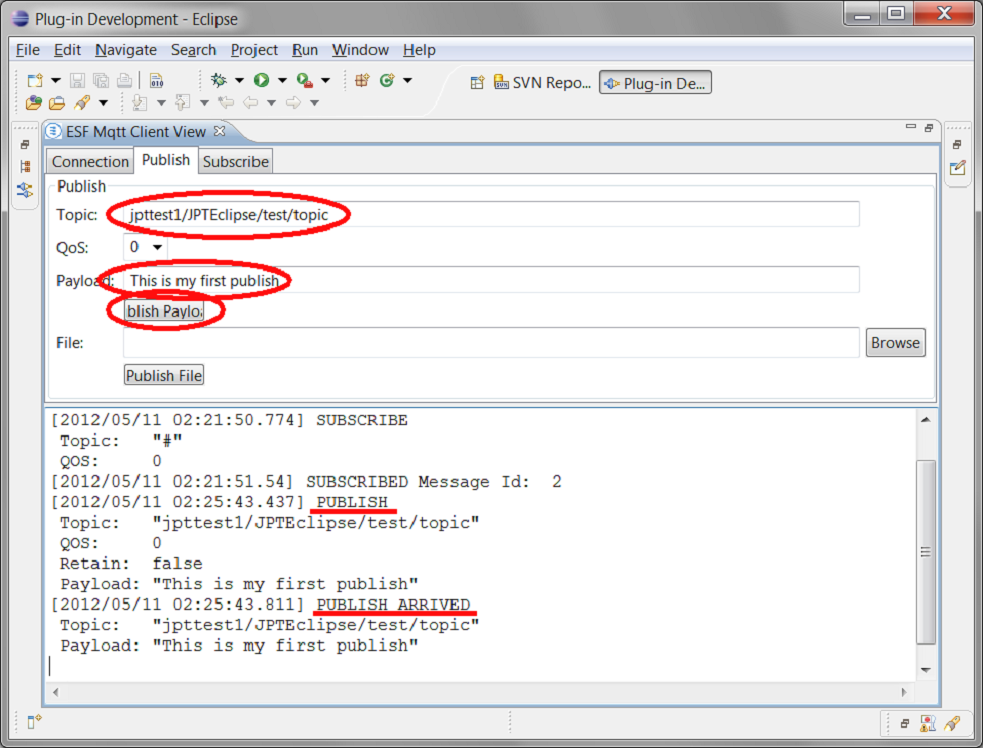
You can see the “PUBLISH” diagnostic as your client publishes its message to the broker. It is followed by a “PUBLISH ARRIVED” message that returns the same data to our client. The “PUBLISH ARRIVED” message displays because you had previously subscribed to the topic “#”. Otherwise, you would only have seen the PUBLISH, not the PUBLISH ARRIVED.
In the Eclipse MQTT Client, you can publish text messages by selecting the ‘Publish Payload’ button or select a file as the payload by choosing a file and clicking ‘Publish File’.
The Eclipse MQTT Client View can be used as a debug tool for applications that are sending and receiving data from the broker. It can be used to validate that devices are publishing appropriate data on the appropriate topics to emulate messages that would come from the Cloud to the remote device.
More About MQTT Subscriptions
Now that you have successfully published and subscribed to the MQTT broker, it will be helpful to learn a few more things about MQTT subscriptions and topics. Previously, you subscribed to “#”, which delivers all messages published on this account. However, the power of subscriptions and topic namespaces is their ability to filter out data to what particular clients desire to subscribe. Follow all the steps in this section to better understand how topics work in MQTT.
Remove Wildcard Subscription
In this example, we will demonstrate the use of topics and subscriptions more fully. Switch to the Subscribe tab, enter “#” in the Topic, and click ‘Unsubscribe’. This will remove your wildcard subscription.
[2012/05/11 04:06:15.747] UNSUBSCRIBE
Topic: "#"
[2012/05/11 04:06:15.809] UNSUBSCRIBED Message Id: 4
Enter New Subscriptions
Next, enter two new Topics clicking ‘Subscribe’ after each one (using your username and clientID).
Topic: username/clientID/status
Topic: username/clientID/data/#
For example, you should see output like
[2012/05/11 04:10:58.218] SUBSCRIBE
Topic: "jpttest1/JPTEclipse/status"
QOS: 0
[2012/05/11 04:10:58.265] SUBSCRIBED Message Id: 5
[2012/05/11 04:11:06.908] SUBSCRIBE
Topic: "jpttest1/JPTEclipse/data/#"
QOS: 0
[2012/05/11 04:11:06.954] SUBSCRIBED Message Id: 6
Test “status” Subscription
Switch to the Publish tab. Publish the following Topics and Payloads (again using your username and clientID).
Topic: username/clientID/status
Payload: Status is okay
Topic: username/clientID/status/alarm
Payload: Door was left open!
Notice that because of your subscriptions, only the first of the two published messages arrives back at your client. The one published on the “status” topic arrives, while the one published on the “status/alarm” topic does not arrive.
[2012/05/11 04:15:37.401] PUBLISH ARRIVED
Topic: "jpttest1/JPTEclipse/status"
Payload: "Status is okay"
Test “data” Subscription
Publish the following four messages.
Topic: username/clientID/data
Payload: This is data
Topic: username/clientID/data/device1
Payload: This is Device 1 data
Topic: username/clientID/data/device2
Payload: This is Device 2 data
Topic: username/clientID/data/device2/alarms
Payload: This is an alarm for Device 2
Note that you receive all of them back. This is because the “#” at the end of your “data/#” subscription is a wildcard, meaning to accept all published messages that match anything up to the last element in the topic of any published message that arrives at the broker.
[2012/05/11 04:19:53.872] PUBLISH ARRIVED
Topic: "jpttest1/JPTEclipse/data"
Payload: "This is data"
[2012/05/11 04:21:12.606] PUBLISH ARRIVED
Topic: "jpttest1/JPTEclipse/data/device1"
Payload: "This is Device 1 data"
[2012/05/11 04:21:29.267] PUBLISH ARRIVED
Topic: "jpttest1/JPTEclipse/data/device2"
Payload: "This is Device 2 data"
[2012/05/11 04:22:52.386] PUBLISH ARRIVED
Topic: "jpttest1/JPTEclipse/data/device2/alarms"
Payload: "This is an alarm for Device 2"
Next, publish the following topic. Note that the “clientID” specified in your previous subscriptions is replaced with “newClient”.
Topic: username/newClient/data
Payload: This is data on a newClient
You do not receive this message back, because it does not match the subscription that you entered previously. If you want to receive all messages published to all client ID’s, use a wildcard in the second position of the topic string. However, the # sign cannot be used in the middle of a topic subscription. Instead, use the “+” symbol in a middle element of a topic. This applies to any middle element of a topic string, not just the client ID. An example in the Using “+” for Wildcard section shows the use of the “+” in subscriptions.
Removing Subscriptions
Subscriptions can also be unsubscribed. Go back to the Subscribe tab, enter the following topic, then click ‘Unsubscribe’.
Topic: username/clientID/data/#
You will not receive any messages on any topic ending with “data” in the third topic field, but you would still receive messages published with the topic “username/clientID/status”. You can only unsubscribe from topics to which you have previously subscribed (in exact form). If you try to unsubscribe from a different topic or a wildcard subset of a current subscription topic, Eclipse doesn’t warn you, but that unsubscribe action has no effect.
Using “+” for Wildcard
As previously mentioned, the “+” symbol can be used in the middle of a topic as a wildcard. On the Subscribe tab, subscribe to the following two topics. Note that you can have multiple “+” wildcards in the middle of a topic, and (if you choose) also include the “#” wildcard at the end.
Topic: username/+/data
Topic: username/+/data/+/alarms/#
On the Publish tab, now publish again the last message that you published in the previous example.
Topic: username/newClient/data
Payload: This is data on a newClient
You do receive your publication because of the “+” in the subscription.
[2012/05/11 04:46:53.120] PUBLISH ARRIVED
Topic: "jpttest1/newClient/data"
Payload: "This is data on a newClient"
Finally, publish the following messages, which are similar to the previous ones, but with “newClient” in the second field of the topic.
Topic: username/newClient/data
Payload: This is data
Topic: username/newClient/data/device1
Payload: This is Device 1 data
Topic: username/newClient/data/device1/alarms/critical
Payload: This is a critical Device 1 alarm
Topic: username/newClient/data/device2/alarms
Payload: This is an alarm for Device 2
You receive the 1st, 3rd, and 4th messages back because “newClient”, “device1”, and “device2” match the “+” wildcard used in your subscription. The 2nd message does not arrive, because it doesn’t match any of your current subscriptions.
[2012/05/11 04:59:20.219] PUBLISH ARRIVED
Topic: "jpttest1/newClient/data"
Payload: "This is data"
[2012/05/11 05:01:05.351] PUBLISH ARRIVED
Topic: "jpttest1/newClient/data/device1/alarms/critical"
Payload: "This is a critical Device 1 alarm"
[2012/05/11 05:01:43.774] PUBLISH ARRIVED
Topic: "jpttest1/newClient/data/device2/alarms"
Payload: "This is an alarm for Device 2"
This is the end of this tutorial on the Eclipse MQTT Client View and MQTT publish/subscribe mechanism. To make this client disconnect from the broker, close Eclipse or switch to the Connection tab and click ‘Disconnect’.